Category Archives: Inquisitor

Primaris Legion Of The Damned (1)

The Damned – Smash It Up


In the last post, I said that I would go through what I’m planning to do with the Quaranin model I made last year – but I won’t.

I needed a break from painting miniatures, and I’m not quite ready to start a lengthy project just yet.

So, instead, a short one – a primaris Legion of the Damned marine:


It’s quite a basic conversion, from one of the easybuild models – you can see the parts used:

I will try to make tutorials about painting flames, and the freehand banner, in upcoming posts.

Inquisitor Blacktalon (7) – Finished

Wolf Alice – St Purple & Green 


I’ve finally finished Inquisitor Blacktalon:


It’s a lot brighter and cleaner than the Blanchitsu aesthetic tends to be – but I think that’s okay; as my painting style is usually quite drab, and this was intended to be a step outside my personal comfort-zone.

The main aim for painting this was to practice non-metallic metals – although I definitely haven’t mastered them, I think I have improved.


I was going to continue the Inquisitor warband that I left off last year, in order to paint the Typhus model – but I’ve decided to do something different with the Quaranin figure; which I will go through in the next post.


Inquisitor Blacktalon (5)

XTC – Love At First Sight 


The non-metallic golds proved as tricky as I expected, which is why it’s taken so long between updates.

I definitely haven’t mastered non-metallic metals – but I think my technique has improved.

I aim to practice intermittently over the upcoming year; and will hopefully be able to put tutorials together, eventually.

These were the paints used for the gold areas:

And for the silver areas:

Non-metallics are much brighter and warmer than true metallic paints, so a few areas need rejigging slightly. I will see if I can go through these in the next post.

Arco-flagellant (5)

Pearl Jam ‘Last Exit’ 


I’ve adjusted the arco-flagellant’s armour, as it really didn’t sit right being left so plain:


I’m not sure when the next posts will be – but I will try and put together a short series about painting miniatures for display.


Arco-Flagellant (4) – finished

Clio – Faces

I decided to keep the armour on this quite plain.

It seems like a bit of a kop-out not to paint a freehand design, somehow; but it looked too disordered when I painted a pattern on it:


I’m going to take a short break from painting miniatures, as I have some unrelated odds and ends to attend to.

I hope to start working on a model for somebody’s Christmas gift, though – so I may put the Inquisitor retinue on hold for a while.


Arco-Flagellant (3) – painting electric flails

Suede ‘electricity’


How to paint electric flails – this took a lot of trial and error, so it wasn’t really possible to take work in progress shots; but the basic method is fairly straightforward.

Paints needed:


Base: black.

Layer: Caledor Sky.

Paint the area around the power-source (i.e. the wrists), and energy lines: Temple Guard Blue.

Wash: Caledor sky.

Highlight the energy lines: Baharroth blue. Add white, to highlight the lines nearest the power-source, and to paint small sparks/flashes in random places.

Glaze: Royal blue + a small amount of Smoke.


White paint contains a lot of pigment, so when you add it to the blue it becomes quite chalky. Glazing smooths this out; and also helps to create the impression of an underlying glow.

Arco-Flagellant (2) – painting metal areas

m83 – claudia lewis


I wanted the metal areas on the arco-flagellant to look cleaner and brighter than I usually make them.


Paints needed

To paint the brass areas

Base: Tin Bitz + Dwarf Bronze + German cam. black brown

Shade: wash with smoke + black

Highlight: 1) Tin Bitz + Dwarf Bronze 2) Dwarf Bronze

Paint chips/cracks: black + brown

Edge highlight: glorious gold


To paint the steel areas

Base: Gunmetal

Shade: wash with black + smoke

Highlight: 1) Gunmetal + small amount of Tin Bitz 2) gunmetal

Paint chips/cracks: black/brown

Edge highlight: chainmail silver


Glazing can add tincture to the metals – in this case, a bit of warmth.

Although it can be tedious, 4-6 thin coats will give a smoother and more consistent effect than 1-2 heavy applications. So:

1) Glaze all metal areas with several thin layers of Seraphim Sepia.

2) Glaze the steel areas with Reikland Flesh.

3) Glaze the brass areas with Druchii violet.

4) Paint the recesses of all metal areas with Agrax Earthshade.


I haven’t figured out how to paint the black armour yet; but I will make a step by step guide to painting the electric flails next.


Arco-Flagellant (1)

Lightfoils – Diastolic


I’ve made a start on the arco-flagellant – though I’m not sure how to paint the carapace armour yet:


I’ve been thinking about a geometric design; but I like the aesthetic of the costumes in the Black Panther movie – so, I might try and incorporate a similar theme.

I’ll make a tutorial on how to paint the electric flails; and also the skin – as it needs to look slightly more necrotic than the previous models.


Mendicant (3)

Ivy ‘worry about you’ 


I’ve finished this, now – the patterns were mainly drawn from Maasai designs; but hopefully without looking out of place in a 40K setting:


I’m going to paint the arco-flagellant next – partly just as a break from painting patterned clothing.

I’ve changed the model slightly though, as the shield on the back spoiled the silhouette of the figure; and the electro-flails also looked a bit gauche:

You can see the changes here:

Mendicant (2)

Miniatures ‘Honey’ 


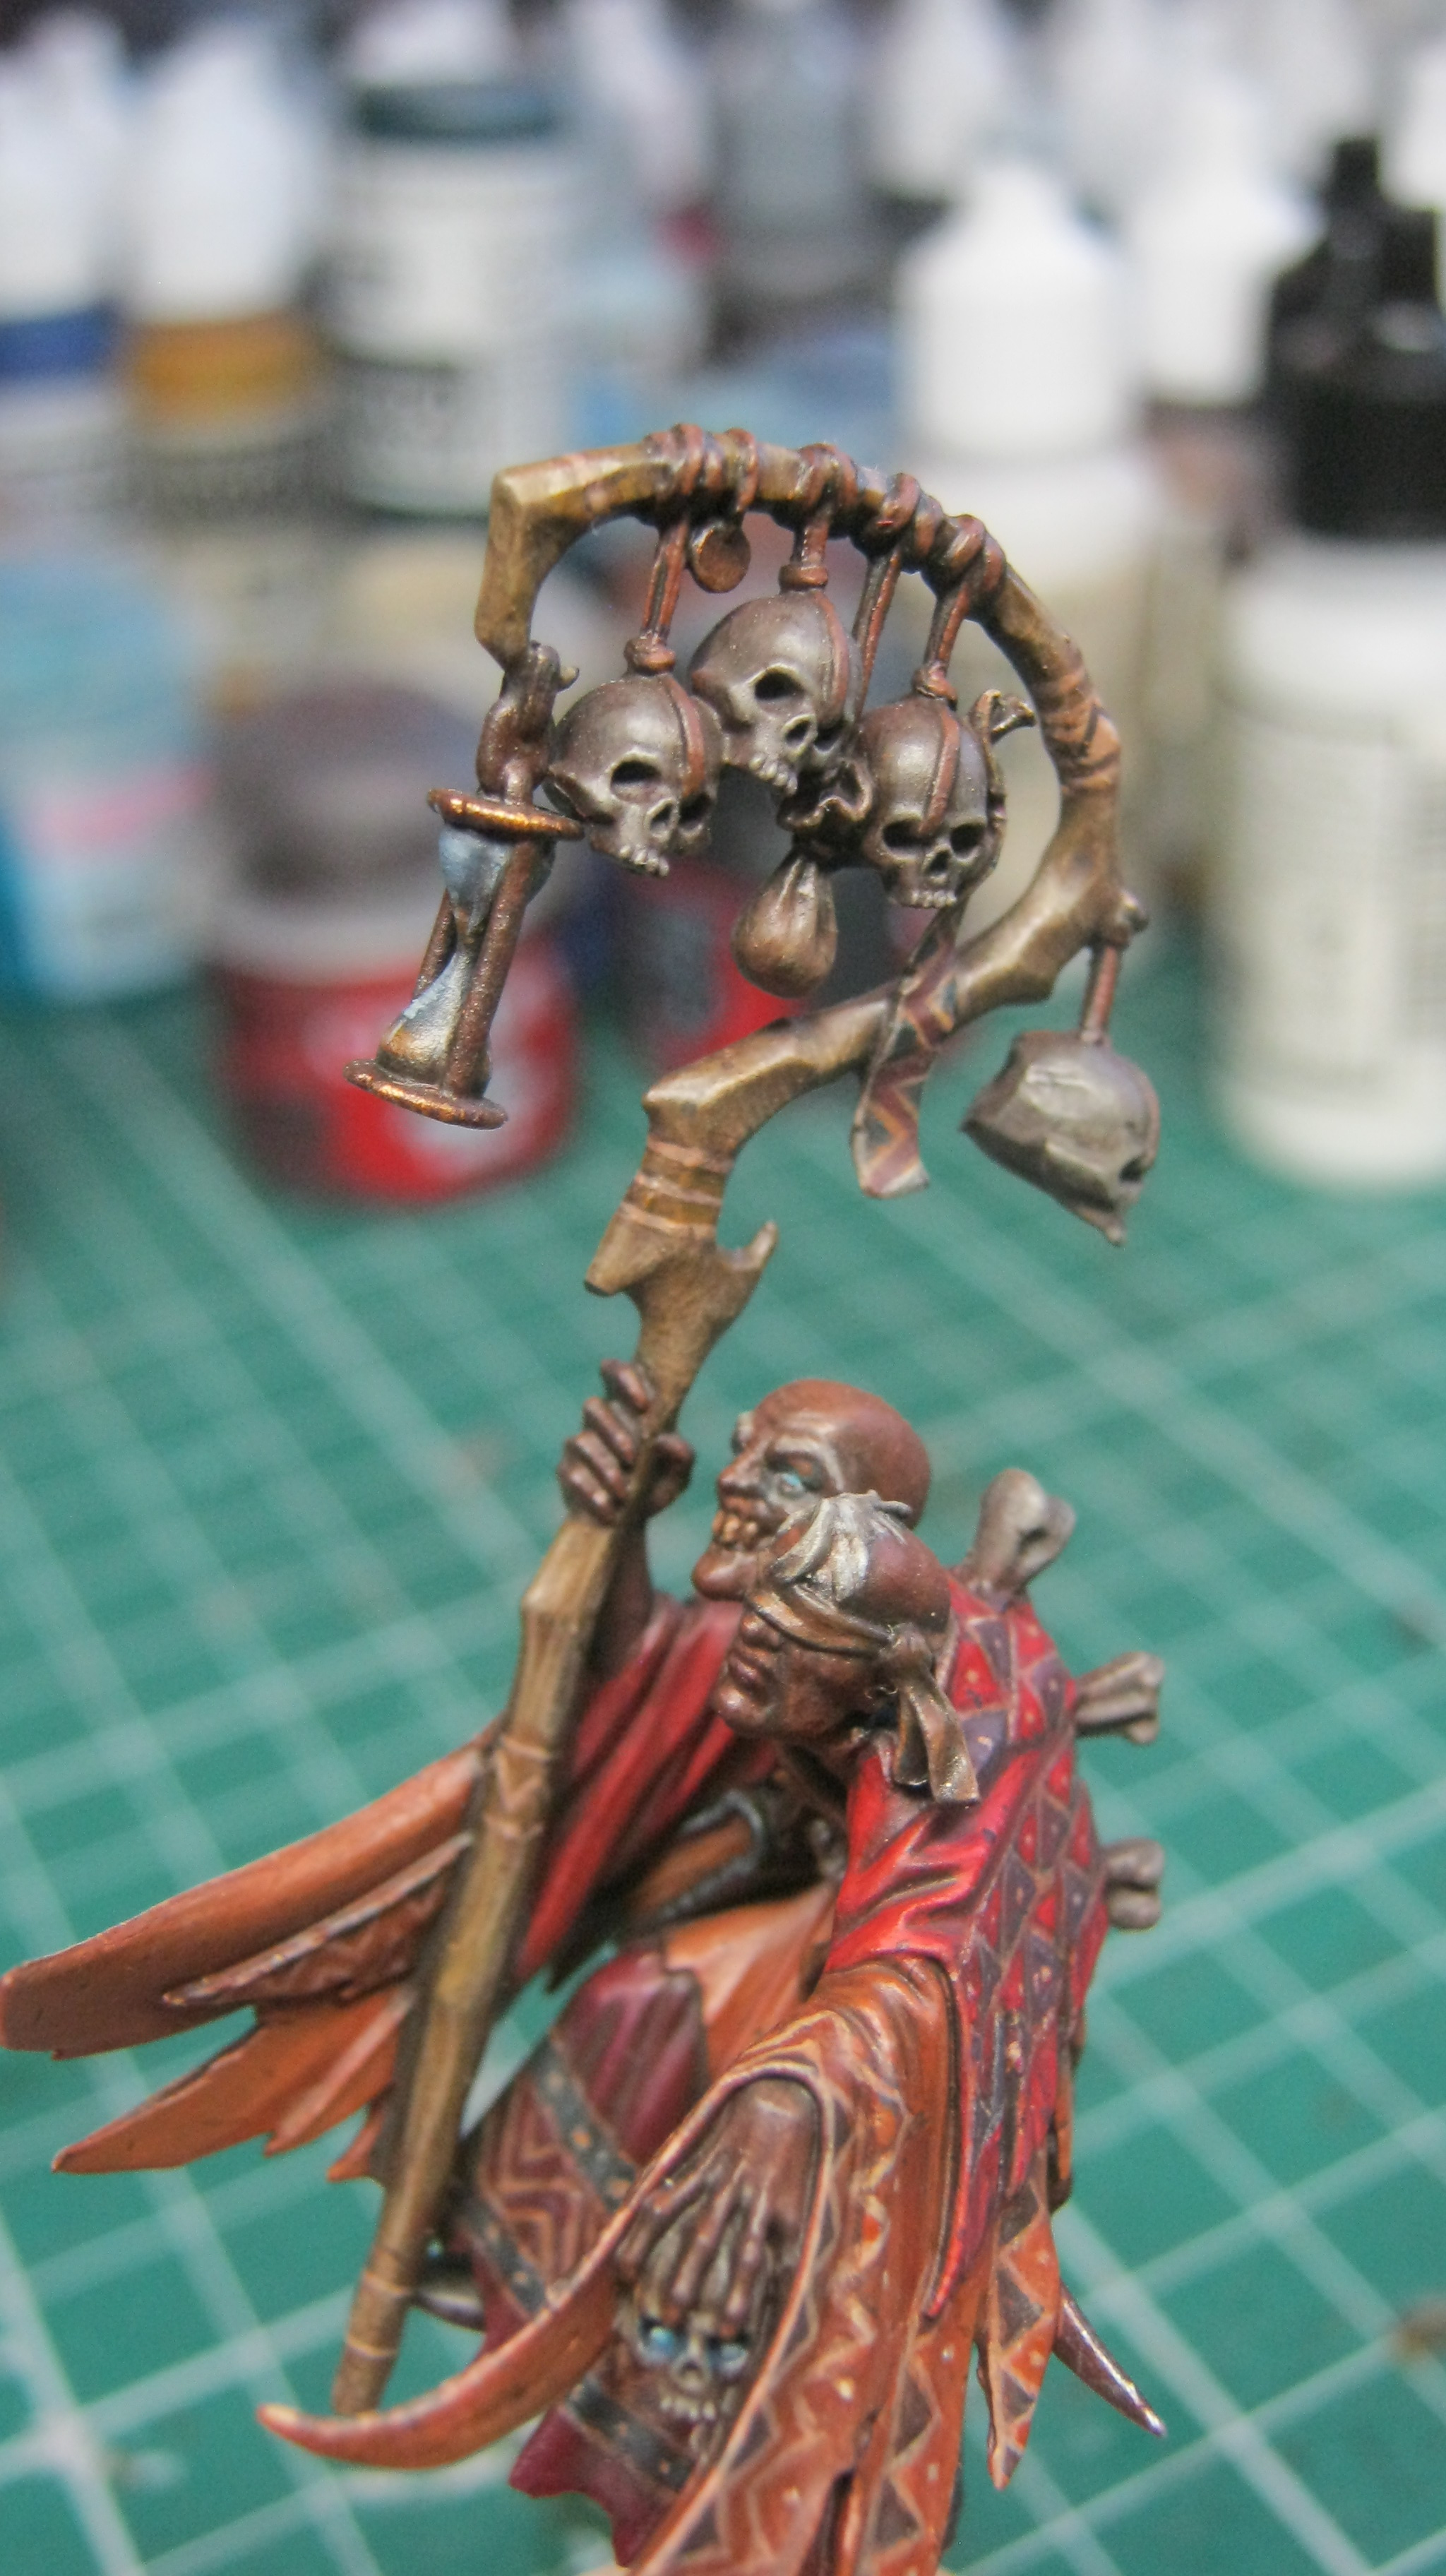
I’ve finished the basic painting of the Mendicant figure:


I painted the skin on this model slightly differently to the dark tone of the Cherubhim – as using Rhinox Hide left it looking a bit formless.

The surrounding areas were kept fairly simple, and muted, in order to avoid overshadowing the faces.


Skin

1) German Cam. Black Brown

2) Wash: smoke + tank brown + black

3) Rhinox Hide

4) Mournfang Brown

5) Mournfang brown + Ushabti bone (add increasing amounts of Ushabti bone, over successive layers, to highlight: less is more, here).

6) Glaze: smoke.

Hourglass

1) Black

2) The Fang

3) The Fang + Fenrisian grey

4) Paint the sand using Zamesi desert

5) Wash over the glass/sand with the same smoke + tank brown + black mix as above.

6) Highlight the glass using Fenrisian grey, and the sand using Zamesi desert + khaki

7) glaze: asurmen blue, then smoke.

Skulls

1) USA Olive Brown

2) Earth + Fenrisian grey (drybrush this)

3) Wash: smoke + tank brown + black

4) Drybrush Earth + Fenrisian grey again

5) Add Rakarth flesh to the above mix (drybrush)

6) Wash: USA olive brown

7) Edge highlight with Rakarth flesh

8) Glaze: smoke

I also painted the hair with these colours – but added white instead of Rakarth flesh to the mix, so that it would catch the eye; and ensure the faces remained the focal point of the miniature.

Staff

1) Leather brown

2) Wash: smoke + tank brown + black

3) Drybrush leather brown

4) Drybrush  leather brown + zamesi desert

5) Drybrush khaki

6) Paint scratches/edges with khaki

7) Glaze: smoke


It needs freehand designs painting on it, now; which will be based on Maasai patterns. This may take some time.